Tuesday, April 23, 2013

Baby Announcements

It was my privilege to be able to design and make baby announcements for my granddaughter, Adelyn.  I did baby announcements for boh my daughters but those were simply photocopies of a handwritten document with a photo stuck in the envelope.   For the first one we did a Christmas birth theme since she was born mid-December.  For #2 we did a theatrical theme with producer (me), director (DH) and supporting actress (daughter #1). 
Now that I am into stamping and such - I was excited to give it a try.


 This is what I came up with .  The little envelope is a Sizzix die and so easy to do.  I sponged the eyelet edge with Pretty in Pink and added the ribbon.  Pretty in Pink is retiring and I am going to miss it.  I use it a lot on little girly things.  I have stocked up on the ribbon! 

 Inside the envelope is a wallet size photo of our little princess.  We printed her birth details/stats on address labels and put them on back of the photo.

 Here is a closer look at the photo.  Isn't she precious!  Hard to believe he is here.  Mommy and Adelyn came by to visit me at work today.  She is always a hit in the office of ladies :-)   She has changed so much. 


Tonight I am vegging out and just sitting and looking at her pictures and warming up with a hot milk steamer.  It is rainy and cold outside - may even have some snow flurries tonight - so the hot steamer is just the thing! 

Saturday, April 20, 2013

Saturday Morning Therapy

After 10 hours of sleep last night (making up for a restless night before) I spent some time in the craft room finishing up baby announcements for the granddaughter and then playing with some of my retired stash.  I have lots and lots of retired or non-Stampin Up items so those are the ones I play with for my personal use.

The piece of Whisper White is from a Top Note die that I used recently and had cut it in two pieces.  The swirls had a small heart in the center that I covered with a Melon Mambo heart punched from the Owl Builder set. I then sponged the edges with the So Saffron to match the card front. 
I took a scrap of Soft Suede that was still lying on my worktable from the other day and rubbed the edges with the blade of the craft scissors to 'rough it up' a little.   Hello is stamped in Soft Suede.

My daughter needs some thank you cards for those who have been so kind to bring her meals while she recovers from the Adelyn's birth so I played a little with some old Dusty Durango paper and DSP that I still have.   The stamp is from the Occassions Alphabet set and it was perfect for these cards.   I used the Finishing Touches to trim the edges with the zig zag and layered those where I could.  I used Always Artichoke paper and seam binding to complement the Dusty Durango.


I have always liked the stamps on the newsprint type papers so tried one of those too.  I used the Elements of Style and Forest Green Stazon ink.   I was going to color in the flowers but couldn't decide which color to use so did not do that part.  The ribbon is the retired polka dot Dusty Durango turned so the solid side is showing.  I used Very Vanilla for the sentiment and card base.


For this one I took a piece of DSP and adhered it to the card stock, then embossed with the Honeycomb embossing folder.   The embossing on the DSP did not show up very well so I sanded over the it and it popped out :-)

I did a couple more with the honeycomb embossing folder, DSP and sanding but this time I did a faux felt flower with a Cajun Craze button in the center.  The Itty Bitty Banner stamp set and dies made the label really easy to  make.  I used some DSP for it too - it was mostly white with some Dusty Durango flowers scattered on it.   Fot the third card I butted the flower up to one edge and cut it to match.  Just a little something different. I used the soon to retire Not Quite Navy and Always Artichoke card stock and the Not Quite Navy ribbon on these. 

When going through my paper stash I found this sheet from a scrapbook store.  I am always running short on cards for the pre-teen and teen boys and thought this would work for them.  I used Basic Black on some and Perfect Plum on the others to back the paper.  The ribbon is Perfect Plum and the sentiment is from the Wacky Wishes set stamped in Dove Gray Stazon ink. 

And when I was finishing up the baby announcements (I will post a photo of them after my daughter gets them mailed to family) I had to use Sticky Strip to adhere part of the card.  The worst part about using Sticky Strip is the static cling on the red film and you wind up with it all over the place.  This morning I came up with a way that helped control those little rascals and clean up was so easy too.
As I pulled them off I laid them on a scrap paper - they came off my fingers fine and had just enough static to stay put on the paper.  When I finished I simply picked up the paper and threw it away.   So much easier then trying to shake them off your fingers into a trash can - or laying them on the table and then trying to get them all into the trash. 

So - waiting for Adelyn to come visit and we can finish up the announcements and then will have to start prepping for the Simple Cards class next weekend.  Still room if you would like to come :-)

Sunday, April 14, 2013

Birthdays and anniversarys

I use more cards for birthdays and anniversaries than any other so I am always running low on these and looking for new ideas.  Recently I saw an easy but interesting card on Pinterest and CASEd it.   Here is my copy -
Isn't that a fun card.   I made several like that using the same strips of paper and just alternating the width of the strips and the color ink spritzed on the top.  I also made some with rounded edges on the strips.  So much fun to make!


And while I was playing I grabbed out some valentine's DSP with Love written all over it in various fonts and sizes.  I paired Pretty in Pink with Early Espresso and make several Happy Anniversary cards like this one.  Love the interlocking hearts -

so much so that I am also using them on another project.  Here is a sneak preview but can't show it yet :-)

April Club - a grand finale

Club met on Saturday and it is the last one for this rotation, so I have some special cards planned. 
The first card I designed is the telescoping card that I have been wanting to try for a long time.

 Finally forced myself to make one -- then realized the scallop circle dies I used for it are not available through Stampin Up any more - so back to the drawing board.  I modified it to use rectangles instead.


This is the card all folded up. It is three pieces connected with mini brads.
 Here it is opened up.  The sentiment at the botton says "the sky's the limit" - wouldn't that make a great graduation card?

 This one is for the kids.   Everyone loves Mickey - and he is easy to make with some circle punches.


And this one uses a special technique for cutting the top edge.  I saw a video for this online and it is so easy!  The Daydream Medallions and the coordinating framelits are the only ones I have in items that are available currently.  It turned out cute - but not as cute as the ones I saw online.   I designed a couple other samples using some a retired stamp set.

Scraps challenge

 Today I challenged myself to use up some scraps.  I have so many of them that they are taking over the craft room :-) 

I pulled these from the Whisper White supply.  Two are embossed with the Honeycomb folder and one was a piece cut with the Top Note die.  This were from other projects that I did not need for some reason - and just threw them in with my stock.

To go with those I grabbed these items from a shoebox where I had thrown items left over from a day of crafting - to sort and put away later and that never happened.

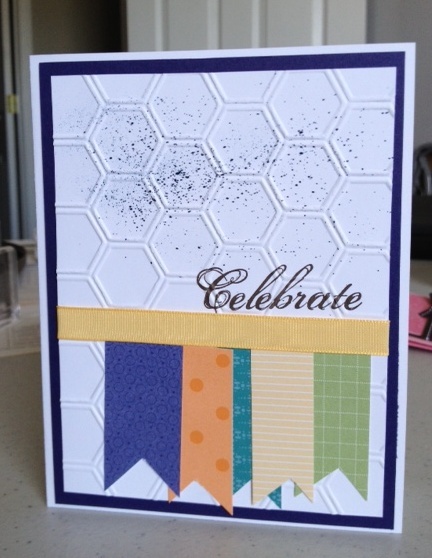
So - here is the first card I finished. I used one of the honeycomb pieces and spritzed some Summer Starfruit on it.   Then I took 4 other colors - Regal Rose, Bashful Blue, Tangerine Tango and Wild Wasabi and cut strips.  The Wild Wasabi was embossed with the SAB Vine folder. 

To get the rounded edges, I placed just one end in the 1 1/4 circle punch.  The strips were about 1 inch wide.   This works great!

Then to get the 'stairstep' lengths I took the shortest one (Wild Wasabit) and laid it on top of color #2 - Tangerine Tango.  I just cut the second piece a little longer using a pair of scissors. The edge did not have to be prefectly straight since I was going to cover it with ribbon.  I did that with the remaining 2 colors.

I lined them up on the lower portion of the card front (The photo is really upside down).  The hexagons on the white made it easy to get these in a straight line.  Then I just wrapped the ribbon around over the edges of the strips and added the flower.  


This one also uses the honeycomb background.  The Wild Wasabi is the remainder of the piece of Wild Wasabi with the vine embossing.   I tied around the scrap of Soft Suede ribbon and mounted that on a piece of Soft Suede card stock and then put it all on a Whisper White card.   I tried adding circles and ovals of the other colors but just did not look right.  At one point the ovals on the green might have made a cute Easter card but I did not want to go that direction.  So I just added the simple Hello stamp from the Tiny Tags set and said "Done!"   I like it and it is such a simple design I  will probably make more  :-)


Number 3 uses the Top Note die.  I adhered it to a piece of Regal Rose so that it hung off the edge - then trimmed it flush.   The swirly stamp is from a retired set but any decorative stamp would do.   The Certainly Celery satin ribbon is accented with a piece of Pretty in Pink gingham ribbon that I found on the clearance rack a couple years ago.  I hate to see Pretty in Pink leaving since I use it a lot for baby girls (and have that new granddaughter !) I'm sure I will find alternates.  I used the birthday sentiment from Petite Pairs ......


and stamped the other half of it inside with another one of the decorative swirls.  I think this is the favorite of the 3 scrappy cards I made.

So here is what I did with my scraps.......

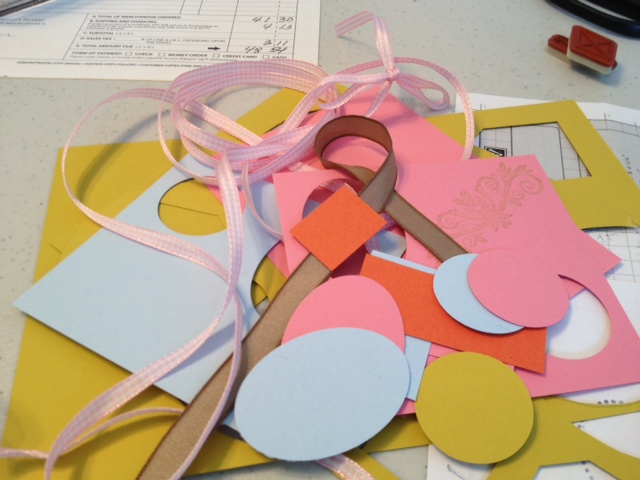
or at least some of them.  This is what I had left after making those 3 cards (see the ovals and circles that I tried to use on card #2)   Saving those for another day :-)

And speaking of the new granddaughter - meet Adelyn Kaylee --


here she is 4 days old and visiting Grandma and Grandpa at work.  We just love her!

Saturday, April 6, 2013

Simple Card Workshop

This started out as a "simple card" workshop but it became a "clean out my stash" workshop :-)   I have 4 cards designed and each attendee will make 8 cards for $15.00.    So here is what I have planned.
 This one uses some retired Designer Series Paper that I love!  It was on the clearance rack recently and I got another pack :-)
The butterfly punch is also retired. 

 This one doesn't use anything that is retired but the More Mustard button will be retired after May.

 The Designer Series Paper in Poppy Parade and Peach Parfait is retired.   So are the star punches.

The Designer Series Paper on this one has been retired for quite a while.  The Certainly Celery button will be retired after May.

The cards are quick and simple - and it is a good way to use up some of my stash. 

Craft Therapy

Finally took some time today for some craft therapy and trying the telescoping card is just what I needed.   I have wanted to try those for some time.  Today was the day!


This is the first one I made.   I used the circle and scalloped circle dies for the Big Shot.  


The card opened.  I did not intend for the larger circle to be on top but it worked out okay.  Then I realized one of the scallop circle dies is no longer available through Stampin Up so needed to come up with something else for the club next week.

So then I designed this rectangle version.  I added a little to it by embossing the Baja Breeze sky with the Cloudy Day embossing folder.  This one can be made without any special punches or dies. 

Here it is opened.  I thought the sentiment ":The sky's the limit" would make this a nice graduation card.