Thursday, February 6, 2020

Masculine Flip Fold

Here is a fun and quick masculine card with a little different fold.


I used a 6 x 6 piece of DSP and cut 2 inches off one edge. Save that for the card front.  Trim the remaining 4 x 6 piece to 4 x 5 1/4. 
Cut coordinating card stock 5 1/2 x 4 1/4 for the base.  Cut a strip 2 1/8 x 11 for the flap. 
Adhere the large rectangle of DSP to the base. Fold the long strip of card stock over the top edge of the base so it wraps over. Adhere the narrow strip of card stock to the back of the card base.  Decorate the front of the strip with the 2 inch strip of DSP, trimming to fit. Add sentiment to the front. 

I added a plain piece of vanilla card stock inside but make sure it is not visible when the card is closed. 


I did this one off center and did not put a piece of vanilla inside.  I will sign it on the underside of the flap. 

Monday, February 3, 2020

Good-bye Hello Honey

Good Bye Hello Honey

Over the weekend I grabbed a couple sheets of English Garden DSP and the remainders of my Hello Honey card stock and ribbons.  I’m trying to clean out some of the retired colors and this would be a good one to start with since I did not have a lot of anything.  


I started with a couple pocket cards and made an error on cutting the DSP so I improvised.  These are not the 5 1/2 x 4 1/4 that would fit in an envelope so I put tags on them that had room to write the recipient’s name.  


With the extra pieces of DSP, I made a couple cards, using the Hello Honey ribbon on all of them.  

 And a couple more cards with Hello Honey ribbon. 


At this point, this is all I had left, a few scraps of the card stock and several lengths of ribbons and twine.


So s couple more cards.  The large piece on Hello Honey had been cut wrong for the pocket card and I just frame it up with Shaded Spruce.  


I tried a couple more pocket cards to make sure I had the instructions correct.  Worked this time, and I got to add some bees :-) 


 I took another sheet of the Englis Garden DS_ and use up some more Hello Honey ribbons.  I believe this was the end of it except the twine.

 So one last card,  I had to grab some scraps out of the trash pile for the sentiment.  The twine is just a little bit of contrast on the card front.  The DSP is from the set named Farmers Market.


And I had one piece of one of the English Garden DSP laying there begging to be featured on a card.  I didn’t have any idea what I was going to do but just kept adding things to this card front.  


Monday, January 27, 2020

Watercolor Cards

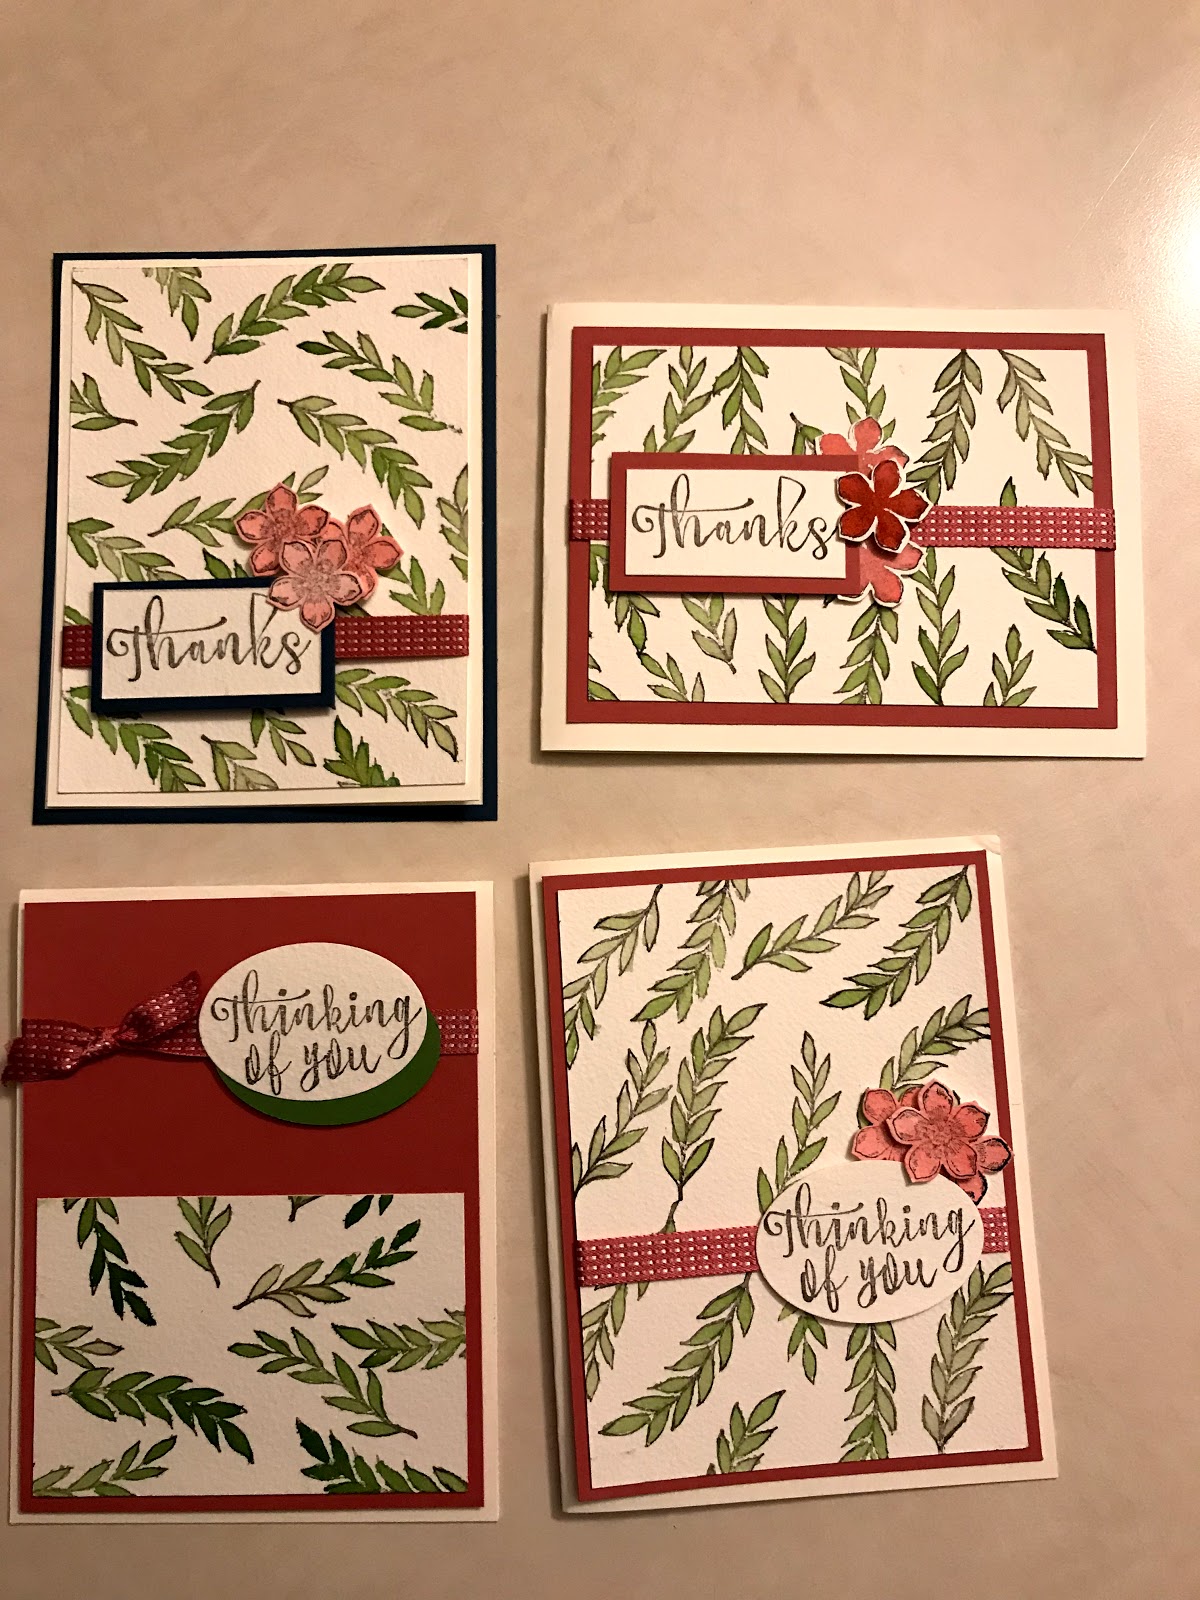
A little while ago I pulled out my aqua painters and some water color paper and played around a little. It was very therapeutic and I liked the results.


I stamped random leaves using 2 different stamps. For the water color I put a couple drops of Garden Green on an acrylic block, then used an aqua painters to pick up a little ink and painted away.  The flowers were stamped but then watercoloredbut it washed away the details on the petals. 


Another card. This time I watercolored a piece of the water color cardstock, 
then stamped the detail.  That worked better. 


Here are all the cards I water colored.  I think I’ll be doing more soon. 

Leap year cards

One of the great things about cardmaking is you can come up with something for any occasion. Recently a friend asked me to make a leap year birthday card - all of the store cards had frogs on them and she was wanting something different.


Definitely a unique card for a special person. 


Another friend saw the birthday card when I shared it on Facebook and asked me to do a wedding card. I was even able to incorporate the wedding colors of dusty blue, cream and gold accents into the card. What a unique special card for their very special day. 


Sunday, January 26, 2020

And a year has passed ........

It’s been over a year since my last post!  I’m going to try to post regularly, mostly with cards I’ve made or food I’ve cooked.

Today I want to share a quick and fun one sheet wonder that I found on Deb Valder’s Blog. You can see it here.  I like it because her template prints at scale so as you cut your pieces you can pay them on the template.  You wind up with only 3 different size pieces so less to keep track of when you assemble the cards. And the little triangle pieces add some interest to the card layout.

Here are some that I made ( with a little variation).

This is actually the last set I made. I have lots of Night of Navy card stock so the cute little butterflies with embroidery on the reverse was a perfect design. I found a couple big packs of 6 x 6 DSP squares on E-Bay and love the variety. 


This was the first set I made. This DSP was also in an EBay package.  It went well with Blushing Bride and Shaded Spruce. I used Poppy Parade on the stamped flowers to pick up the little splashes of red in the paper. 


I was trying to come up with a class idea and I think this would be a good one.  The EBay stack had 3 pieces of the gingham paper and I have the Gingham Galas set of DSP and matching ribbons so I made a couple changes to allow me to add ribbon to the schedule card.  I like the basic black and white with the gingham. 

Sunday, January 13, 2019

Masculine Cards from DSP odds and ends

After organizing my Designer Series Paper (DSP) yesterday, my goal today was to make some masculine birthday cards.  I found a couple on Pinterest that I wanted to try. 


Rustic Argyle

The argyle print is from a color collection several years ago (probably longer than I think) and the banner is from a package of 'sweater' prints.  The embossed background card stock is some that my sister, Jane, embossed for me several years ago (again probably longer than I think).  A great way to expand your designs.  I asked Jane if she had some of the embossing folders that I would like to try and for those she did, I told her which colors I wanted done with which folder.  For the most part, I did a color collection per folder - like Regals with this folder.  So she took a sheet of card stock in each color in the Regals collection and cut it into 5 1/2 x 4 1/4 pieces and embossed them for me.  When she came to visit next, she had a shoebox full of embossed pieces.  I replaced the card stock from my supply at that time.  I still have about 3/4 of embossed pieces to use up!

Angled DSP

The angled strips interested me on this card design.   I have lots of strips in different widths and this would be a way to use up some.  At first, I tried to find strips that were all from the same DSP package so they would coordinate, or at least use common colors.  I soon decided that would make it too complicated and I would wind up with more scraps that I started if I cut from larger pieces of DSP.  So I just started grabbing strips and playing with them.  I like the graph paper as the background on this one. 

More angles

I came up with so many combination of strips that I made 6 more cards based on that design.  Not sure which one I like the best but the upper left corner really catches my eye.  I'll have to remember this design.  It could be used for ay theme depending on DSP used or colors.  I want to try it with baby prints for a New Baby card, or maybe some strips of birthday prints for a birthday card.  So many possibilities!

Snow Day Fun - my style

We got hit with about 7 inches of snow Friday night so Saturday was a snow day.  I don't care to play in the snow - plus I have been battling a persistent cough so didn't feel I needed to be outside anyway.  Thankful I did not have to go anywhere and could just spend the day in my jammies and binge on McLeod's Daughters on Amazon Prime.  But I did get quite a bit accomplished.
Our beautiful backyard

I organized my DSP.  I took all the partial sheets and cut them into sets of a 6 x 6 inch square for an envelope liner plus a piece to use on a card.  For those that were not large enough for the 6 x 6 square I cut a 3 x 6 strip to use to cover the envelope flap.  So now I have a big stack of DSP all ready to make cards with coordinated envelopes.  I also divided them into three categories - Flowers/Feminine; Basic/Masculine; Colorful/Juvenile.  Doesn't mean I would not use a Colorful piece for something other than Juvenile or a Basic (polka dots for example) for something other than Feminine. It just gives me a place to start if I am looking for something to make a particular card.
I also sorted the 12 x 12 sheets (and numerous unopened packages) into similar categories.   I had a few extra categories for those - single color, specialty papers, holiday papers, etc. 

One of the many piles of DSP.

 After lunch, Bekah and I worked together to get the Christmas tree down and everything boxed up.  Tom planned to shovel the driveway when he got home from work, but a couple young men came by about 30 minutes before I expected Tom home and gave me a decent price to clear the snow, so I hired them.  They were just finishing when Tom got home and he agreed it was worth the price.  So he helped me finish up the Christmas stuff instead, carrying the larger boxes to storage in the basement or garage, cleaning up the needles, and getting furniture put back in place.  It was nice to get that done - but my snowman decorations and snow village will stay out through February.

After supper, I found some time to make some cards.  I took some of the kits I had left from my last card workshop and used them to fill up my birthday and anniversary stash. I figured it was appropriate to use a few snowman kits to make some birthday cards. So I guess you could say I made a couple snowmen without getting in the snow.

Snowman Card Kit

To change this kit from a Christmas card to a birthday card, I just trimmed of the sentiment and then adjusted the blue card stock to match. 


Snowman Birthday Card

I plan to write Warm birthday wishes inside the card.   But on one of the card I forgot to trim the sentiment so had to do a little modification. So I turned the card horizontal and added the DSP at the bottom.

Snowman Modification

I could not get the snowman image off the darker blue card stock so I punched the circle through both layers, then mounted on a scalloped circle.  I added a little ribbon and voila!  I kind of like this card, especially since there is limited space to write inside (just the top half ) so it will be fine to just write Warm Birthday Wishes and sign our names.  


Gryffindor Quilt Square
Before going to bed, I pulled out the Gryffindor quilt square. Haven't done any cross-stitching for about a month!  I didn't get a lot done but it was good to at least do that.  

Today I am headed back to the craft room to make a few masculine birthday cards.  Seems like I am always running out of those.