Sunday, June 20, 2010

1/4 Sheet Wonder

I have learned of a new 'technique' called One Sheet Wonder and an adaptation of that is the 1/4 Sheet Wonder. You take 1/4 sheet of Designer Series paper and make as many cards as you can trying to use every bit of the DSP. Here is my attempt. I did manage to use every bit of the DSP - no scraps :-) at least no DSP scraps - of course I had some card stock scraps to add to my box.


I used the new Greenhouse Gala paper which matches one of the new stamp sets perfectly but I don't have that set yet (hopefully it will be on the way soon) I also used the new colors, Daffodil Delight, Cajun Craze, Cherry Cobbler, Marina Mist and Early Espresso. Love how these all work together.


Card #1 For this one punched using the Heart to Heart punch and layeted the DSP behind the 'holes' I then punched a couple sets out of the Marina mist and added them. The applique stitching is done using a white gel pen.

Card # 2 The DSP here is cut 1 x 5 inches and punched on both long sides using the Scallop Border. I added the 1/8 inch taffeta ribbon in Early Espresso and stamped the sentiment from the Herb Expressions (a new set for me) in Early Espresso too.

Card # 3 Here the DSP is cut in 1 inch squares and patchworked on a square of Cajun Craze. The flowers are punched with the trio flower punch (you could use the Boho Blossoms or small punches for the itty bitty buttons - hmmm will have to try that too :-) This sentiment is also from the Herb Expression set. The brads are from the Vintage brad set.

Card # 4 This stamp is from the It's A Thought stamp set - a hostess set in the summer mini catalog. I used the hearts that I punched out for the first card on this one (used up some of my scraps :-)
The image is on Whisper White with Daffodil Delight sponged on the edges. The DSP is layered on Early Espresso and the card is Daffodil Delight.

Card # 5 This is also a stamp from It's The Thought set. The ribbon is the 1/8 inch taffeta in Daffodil Delight. The card is Cherry Cobbler.
Here are the directions for cutting the DSP if you would like to try these cards yourself -
Cut one strip 1 inch wide, and one strip 2 inches wide which will leave a strip that is 3 inches wide. From the 2 inch strip, cut off one end at 4 inches - this will give you a 2 x 4 inch strip (use for card 1) Cut the remaining 2 x 2 inch square into four 1 inch squares to use for card # 3.
From the 1 inch strip cut a 1 x 5 inch piece to use for card # 2 - the remaining 1 inch square is used for Card # 3.
Use the five 1 inch squares for card # 3.
Cut the 3 inch strip into at 4 inches giving you a 3 x 4 inch piece and a 3 x 2 inch piece. Use the 3 x 4 piece for card # 4 and the 3 x 2 piece for card # 5.
Have fun trying your own combination!

Tuesday, June 8, 2010

Card sets

I am planning a Stamp-a-Stack workshop in July and these are the card sets we are making.

One set uses designer series paper - I have quite a stash of that :-) This paper is from the mini occasions catalog called Shades of Spring. I used Certainly Celery and Crumb Cake (Kraft) card stock. The sentiments are all from the Teeny Tiny Words stamp set. I used the modern label and word window punches. There are 10 cards and 12 sentiment tags. You can keep the tags loose and just add the appropriate one when you are ready to send the card.


A closer shot of the cards. The sentiments here are just laying on the cards to show how they look when completed.


The box has an extended flap on the left side. The other three sides are folded over twice to make them sturdier.


This set uses solid color card stock that is embossed using the Big Shot. I used Melon Mambo for this one with white satin ribbon. In addition to the Teeny Tiny Words, I used the Oval All stamp set. The tags are punched using the large oval and scallop oval punhces.


This is what the card would look like once you add the sentiment.


The box makes this a nice gift set.

Mirrors


These are some of the mirrors we made at our last family Stampin Up club gathering. The mirrors came with a wide (3 inch) wooden frame and we decorated them with designer paper and embellishments. I have posted a few individual photos below so you can see how different they are- yet all were beautiful!


This one was Bekah's. She had some trouble with the bow so decided to just wrap the ribbon around the frame. I think it looks great!


This is Katie's. She learned how to make faux suede and did a twist on her ribbons. She also liked the off centered matting which gives hers its own personality.


This is mine. I also learned how to do faux suede and made some flowers using the five petal punch which I had seen online. They are so easy - yet add so much to the frame. A great three dimensional accent.


Here is Jill's - she liked the flowers so I taught her how to make them.


And here is Kelly's. I like her butterflies and the flowers from the Simply Said stamp set.
I will be doing some mirror workshops in July. If you are interested in more information, let me know!

Thursday, June 3, 2010

Scrapbook Guest Book

For my daughter's wedding I am making a scrapbook that will serve as the guest book. Pages in the plastic sleeves will decorate the tables along with die cuts on which people can sign their name and add a few words of wisdom. It has been fun designing the pages so thought I would share a few of my favorites here.
This one is Ballet Blue and So Saffron - the wedding colors.


For this one I used a rub-on to decorate one of the circles and added a felt flower and leaf. The page is covered with circles in two sizes using Regal Rose. The background is designer series paper with Rose Red.


More rub-ons with some Sahara Sand and Soft Suede papers. I crimped the Soft Suede.


Stars are always fun. This is Summer Sun and Ballet Blue.


An elegant one - hearts in Whisper White on a Tempting Turquoise background. And another rub-on. The dove is made using the Big Shot with Bride paper.


Another one with Rose Red and Regal Rose. This one uses a couple butterly dies and a rub on that says You are so sweet


For this one, various heart shapes in So Saffron and Pretty in Pink on a Regal Rose background.


This one uses Close to Cocoa background with Chocolate Chip ribbon. The buckles are made from Pumpkin Pie, So Saffron and Pretty in Pink to match the flower brads.

Monday, May 24, 2010

Decorated mirrors

A few weeks ago, our family 'Stampin Up Club' celebrated the end of our year with a visit to my sister's apartment to play with all her toys. A couple weeks before that 5 of us were shopping at an IKEA store and found some decorative mirrors with wide wooden frames and thought they would be fun to personalize with our own special touch. So when we were all together that is exactly what we did.


This is the one I did using Cottage Wall designer paper, Heard from the Heart stamp set, Five Petal Punch and the Trio Flower punch. I used the faux suede technique on the squares behind the sentiment. The flowers in the lower right were cased from some other demonstrators and are so easy!


This one was made by DD #1 - she did not get the 'craft' gene in the family but did a great job on this. It will look nice in their apartment. The stamp set she used were Upsy Daisy. (I don't know which set she used for the verse).


DD #2 did this one. When we got home she modified the ribbon somewhat but this picture was taken before that.
It was a great time and a fun way to spend a "girls' weekend". Several of my SU customers want to make one so guess I will be scheduling a workshop in July (Have to wait until after June 26th as I will be a little busy until then).

Friday, May 21, 2010

Scalloped Pinwheel Tutorial

This is a tutorial for my modification of the pinwheel - a scalloped pinwheel.

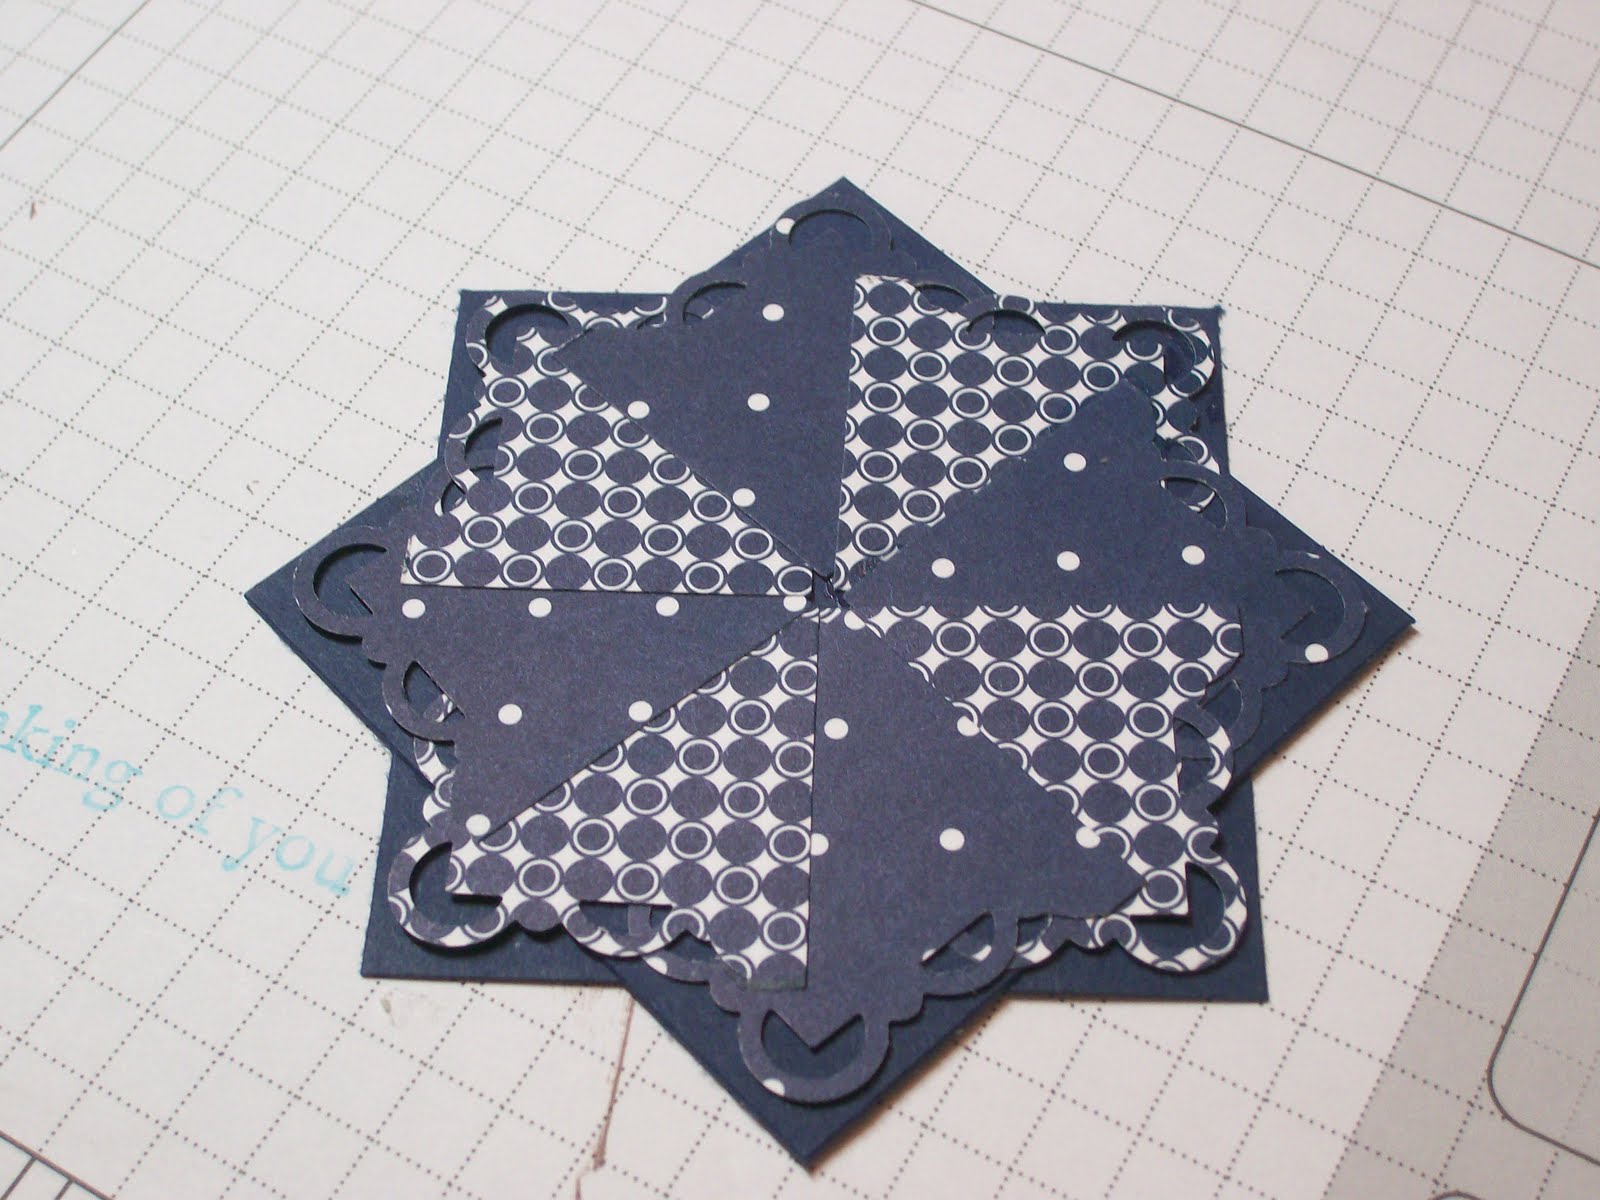
You will need two 3 inch squares of DSP of your choice and two 2.5 inch squares of the card stock that you want to use as your base. You also need the scallop corner punch and the 1 1/4 inch square punch (You can cut the squares without the punch if you don't have that one) I am using Night of Navy card stock for the base and two DSP Night of Navy sheets from the Pattern Pack III that is currently a Level I hostess gift.


Using the scallop border punch, trim the four corners of the DSP squares.


Using the 1 1/4 inch square punch cut off each corner. You can also use your paper trimmer to cut these squares.


So you now have 8 squares with one scalloped edge - 4 of each design/color.


Place one of the card stock squares at right angles to the other - glue together. Using the grid paper helps a lot getting this lined up perfectly; however, I did many without the grid paper and had no problems with them looking lopsided or off center.


Adhere one of the scalloped squares to a tip of the base - only put adhesive on the right hand side so you can later slide the last piece under the left edge.


Adhere the alternate design/color to the next tip. Alternate squares as you work clockwise around the base.


When adhering the last square you will have to work it under the first square. Then add a little adhesive to the first square's left side to adhere.
(I use Tombow glue for this and it works well - just a small drop in the corners.)


Here is the finished pinwheel. Since my centers rarely match up perfectly I add a sentiment oval or a button to the center.


For this one I used the clear bitty buttons and a piece of DSP punched with the coordinating punch. These are available in the summer mini-catalog.


Here is the finished pinwheel ready to adhere to the front of a card. I loved using different DSP to see what affect I could get - here are some of my finished products:


This one uses Cottage Wall DSP on a Very Vanilla base then placed on a Rich Razzleberry card base. I also used Rich Razzleberry and Orchid Opulence punched with the Boho Blossom punch behind the bitty button.


This is also Cottage Wall on a Rich Razzleberry base on an Orchid Opulence card. The sentiment is stamped using Rich Razzleberry on Orchid Opulence and then mounted on the Rich Razzleberry scallop oval The ribbon is 5/8 inch grosgrain Old Olive just tied in a knot and adhered with a mini glue dot.(This is one of my favorites!)


For this one I used 4 of the colors in the Pattern Pack III (hostess gift in the current catalog), Mellow Moss, Night of Navy, Sahara Sand and Ruby Red placed on a Very Vanilla base. The sentiment is stamped in Not Quite Navy on Very Vanilla mounted to a Sahara Sand scallop oval. The card base is also Sahara Sand.


This one also used the Pattern Packs III paper - only the Ruby Red and Sahara Sand mounted on Night of Navy card stock. The card base is Sahara Sand. Using the same design but different colors gives the pinwheel a different look.


This is the pinwheels I made in the tutorial - I place it on a card of Sahara Sand. I love these because I can just make up the basic card and add the sentiment later. Or use with no sentiment and just write the message inside. Great cards to have on hand!


This one uses Bella Bleu and I think it has a different look because the papers sort of blend together. Love this one!


The Bella Bleu one gave me the idea to try one using just one DSP and here it is. This is also a cute idea. The scallops give the card a sort of 'doily' look. I liked making these so much I have added them to our club agenda for today. I am going to just let the ladies pick their DSP and colors and decide what type they want to make.


I think the very first one I made is still my favorite (maybe because it is my daughter's wedding colors :-) I do think the background card stock makes a difference. You want to be sure there is enough contrast so the scallops show up nicely.
Hope you enjoyed my little adventure with the pinwheel. If you make some - please share your pictures - and if you would like to make some but don't have the tools/supplies contact me, I can help you get them :-)

Wednesday, May 19, 2010

A cute idea


I thought of this twist on the pinwheel design while laying in bed this morning - not wanting to get up. So had to try it and love how it looks. I used So Saffron and Ballet Blue card stock, So Saffron designer series paper, Scallop Corner punch, Large Oval punch and the Scallop Oval punch.